This week I took a look at the website for the Partnership for 21st Century Skills. My initial response was: "Where is there room for the arts?" Most of the pieces of information available on the home page showed me students in science and language arts classes and most of the information given was specifically not for visual arts or music.
Upon further investigation, I found some tag-words mentioned in the framework; "critical thinking" "media" "collaboration". These skills are all used in the arts. The framework also mentions the core subjects as the "3Rs" (which is misleading) then further describes them as: English, reading or language arts, mathematics, science, foreign languages, civics, government, economics, arts, history, and geography.
The more I began to read, I also noticed that while I liked some of the framework presented, this plan would once again add additional assessment for students. I couldn't find any assessments for the elementary level, so I'm not sure how they would be measured. I also feel this partnership assumes schools can purchase and maintain 21st century classrooms, which isn't the norm for schools (at least in my area). We are making improvements to the amount of technology available to students, but the changes are occurring at a much slower pace than technology becomes available.
Overall, I feel the site provides some information and general framework guides, but lacks specific planning necessary to implement into everyday schools. I think everyone needs to take a step back and decide why students are in schools in the first place. Are they there to learn? Meet specific standards the state deems important? Prepare them for a job/career/college/life? Social understanding and how to build relationships? How to succeed? All of the above? Some of the above? The answer appears to be skewed from place to place, but it must be the foundation for whatever framework we place on it for our schools to have the outcome we as a community are seeking.
Sunday, January 29, 2012
Sunday, January 15, 2012
Blogs in the Classroom
One way I feel teachers can use blogs in the classroom is to create a manipulative list of directions complete with pictures much like my previous post demonstrated. With an Activboard, students can scroll up and down to check procedures and view examples. Videos could also be added as well as other forms of media related to the lesson. Personally, I save my PowerPoint presentations on my blogs so they are easy to access and manipulate from my board at the front of the class (since my computer is at the back). This also other teacher to use the same presentation for their own classes.
In my art or music classroom, students could also use blogs to demonstrate or write about their work and be provided with feedback from other students in the class. While I feel this is appropriate for 4th or 5th grade students, I would hesitate having my 1st-3rd graders use a blog by themselves, but we could create a classroom blog together so that everyone would get to participate in the creating process and show off what we made as a class. Individual students could write comments that I could add on the board while students watched and offered ideas.
In my art or music classroom, students could also use blogs to demonstrate or write about their work and be provided with feedback from other students in the class. While I feel this is appropriate for 4th or 5th grade students, I would hesitate having my 1st-3rd graders use a blog by themselves, but we could create a classroom blog together so that everyone would get to participate in the creating process and show off what we made as a class. Individual students could write comments that I could add on the board while students watched and offered ideas.
Sunday, January 8, 2012
Creating a "Crackle" Background
I am always on the lookout for a creative and new way to use my media in my art room, so when my first graders were creating some tissue paper collages and kept getting "Kool-Aid" fingers with the wet glue, I decided to try a little experiment that made for a pretty cool Halloween project.
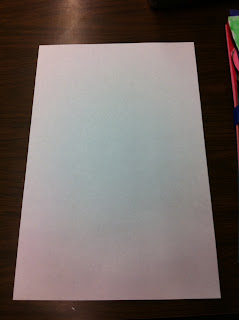
Now, please don't feel limited to Halloween for this project, I will show you how to make the background, you may choose how to incorporate it into your own lessons. To begin with, you need to decide the direction you want the tissue to go. We used strips of paper that I pre-cut before class and our haunted houses were supposed to be tall so we used a portrait orientation. I also used watercolor paper - about 80 lbs or so to be sure the water doesn't make it wrinkle terribly.
Next, choose your color combination and lay the strips across your page. I encouraged my students to slightly overlap each piece so they didn't have a stripe look - unless that's what they were going for!
Keep adding strips until you cover as much as you need for a background. We covered our entire pages since we would be drawing our houses with a sharpie.
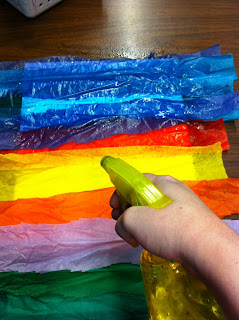
Next, use a spray bottle to lightly mist the tissue. Here's where students will get a variety of results. Lots of water=smoother color, Very little water=great crackle, but not much color, so there's a happy medium to find. I suggested my students spray one section, then gently lift up the edges to see if they liked what they saw, if not, add more water.
I also used a paper towel to blot the tissue to make sure it has good contact with the paper below. More blotting gets more color on the page, while less keeps more white showing.
Then simply lift off the tissue to the trash can and let dry!
Once dry, our students who had been studying architecture, penciled in then added Sharpie to their own haunted house designs. I hope you enjoy creating this crackle with your own students!
Now, please don't feel limited to Halloween for this project, I will show you how to make the background, you may choose how to incorporate it into your own lessons. To begin with, you need to decide the direction you want the tissue to go. We used strips of paper that I pre-cut before class and our haunted houses were supposed to be tall so we used a portrait orientation. I also used watercolor paper - about 80 lbs or so to be sure the water doesn't make it wrinkle terribly.
Next, choose your color combination and lay the strips across your page. I encouraged my students to slightly overlap each piece so they didn't have a stripe look - unless that's what they were going for!
Keep adding strips until you cover as much as you need for a background. We covered our entire pages since we would be drawing our houses with a sharpie.
Next, use a spray bottle to lightly mist the tissue. Here's where students will get a variety of results. Lots of water=smoother color, Very little water=great crackle, but not much color, so there's a happy medium to find. I suggested my students spray one section, then gently lift up the edges to see if they liked what they saw, if not, add more water.
I also used a paper towel to blot the tissue to make sure it has good contact with the paper below. More blotting gets more color on the page, while less keeps more white showing.
Then simply lift off the tissue to the trash can and let dry!
See Slide Presentation:
Haunted houses (crackle)
View more presentations from starcharms.
Subscribe to:
Posts (Atom)


